Civil Aviation Wind Direction Indicator Regulations

APPLICATION

This section applies to all licensed aerodromes.

INTERPRETATION

Expressions used in this section have the same meaning as in section 92.1

REQUIREMENTS

For the purposes of subregulation 89S (2) of the Civil Aviation Regulations 1988, this subsection sets out:

  1. Where a wind direction indicator must be located, and
  2. The circumstances in which more than one wind direction indicator must be installed at an aerodrome.
  3. A wind direction indicator must be located so as to be visible from aircraft that are in flight or aircraft that are on the movement area.
  4. A wind direction indicator must be located so as to be free from the effect of air disturbance caused by buildings or other structures.
  5. Subject to paragraph 3.4.1, if a straight-in landing off an instrument approach is permitted at any runway, a wind direction indicator must be provided at the threshold of that runway.
  6. Paragraph 3.4 does not apply to a runway if surface wind information is passed to the pilots of aircraft approaching the runway through:
  7. an automatic weather observing system that:
  8. Is compatible with the Bureau of Meteorology’s weather observing system; and
  9. Provides surface wind information through an aerodrome weather information broadcast; or
  10. an approved observer having a communication link with the pilots through which timely information about surface wind may be clearly passed to them; or
  11. any other approved means of providing surface wind information.
  12. A wind direction indicator provided at the threshold of a runway must be located:
  13. except if it is not practicable to do so, on the left hand side of the runway as seen from a landing aircraft; and
  14. outside the runway strip; and
  15. clear of the transitional obstacle limitation surface.
  16. If it is practicable to do so, a wind direction indicator provided at the threshold of a runway must be located 100 metres upwind of the threshold.

Note: CASA may issue directions under subregulation 92 (2) of the Civil Aviation Regulations 1988 requiring additional wind direction indicators to be provided at an aerodrome.

REQUIREMENTS

  1. For the purposes of subregulation 89S (3) of the Civil Aviation Regulations 1988, this subsection specifies the standards for wind direction indicators.
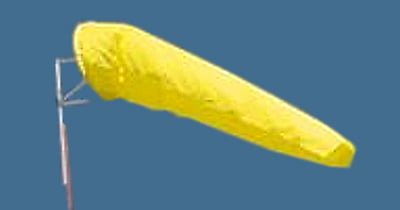
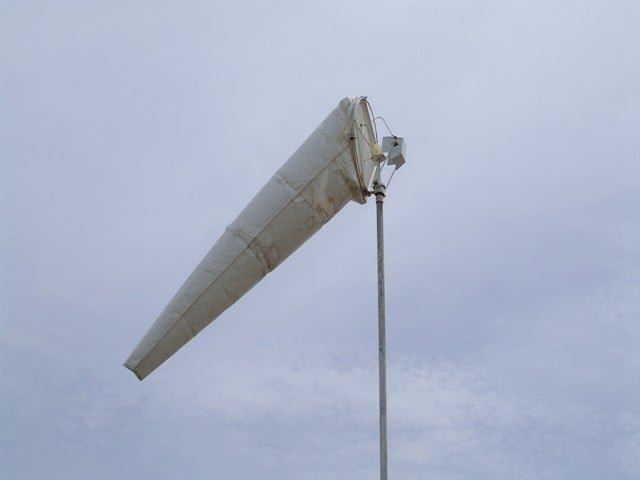
  2. A wind direction indicator must consist of a tapering fabric sleeve attached to a pole at its wide end 6.5 metres above the ground.
  3. The sleeve must be 3.65 metres long and taper from 900 millimetres in diameter to 250 millimetres in diameter.
  4. The wide end is to be mounted on a rigid frame to keep the end of the sleeve open and attached to the pole so as to allow it to move around freely.
  5. The fabric of the primary wind direction indicator must be white and that of any additional wind direction indicator must be:
  6. If it is not intended to be illuminated at night – – yellow; or
  7. If it is intended to be illuminated at night – – either white or another colour that is clearly visible when illuminated.
  8. The primary wind direction indicator must be located in the centre of a circle 15 metres in diameter, coloured black and bordered:
  9. By a white perimeter 1.2 metres wides; or
  10. By a ring of 15 equally spaced white markers each with a base not less that 0.75 metre in diameter.

Wind Indicator


By |2021-06-13T10:03:41+10:00November 28th, 2010|Windsocks|Comments Off on Civil Aviation Wind Direction Indicator Regulations

Windsock Fitting & Care

When using the cable ties to attach the windsock to the windsock frame, ensure that the cable tie’s ‘buckle’ is inside the rim to avoid the windsock material becoming damaged by rubbing on it. Once fitted, cut off the cable tie excess length.

Windsocks will not function correctly if the mouth is not vertical and facing into the wind.

The cable ties should be tight enough to restrict the movement, so that there can be no wear from rubbing of the windsock against the frame.

The windsock side seams should be at the 9 and 3 o’clock positions. (Along side each other, not top and bottom.)

To increase the life of the windsock, remove and rotate 180° after six months, then the following six months, remove the windsock again and turn inside out, re-hang with seams at the sides, then after another six months (depending on the condition) rotate windsock 180° again.

The above actions will more than double the windsock life.

Windsocks are not repairable, a torn windsock may give a false wind speed and direction.

Any windsock will perform at its best without any wind sheer influence from buildings, roof angles, trees, or orographic influences, so where possible consider placing the windsock at a distance greater than 25m from any other standing object, if this is not possible or practical, increase the height of the support as much as possible. Regulation height for a windsock is 6.7m (22ft) for 8 and 12 foot length windsocks.

This measurement is from the ground to the lower rim of the windsock.

This height requirement is not applicable to ‘Wind Indicators’ of windsock design and shape. There are 4 or 6 foot length (120cm and 180cm).

Large windsock pole installation
Windsock pole installation diagram

By |2021-06-13T10:03:42+10:00November 28th, 2010|Installation, Windsocks|Comments Off on Windsock Fitting & Care

Windsock Material For 8 & 10 Foot

Windsock Material for 8 and 12 Foot Windsocks.

Made of compressed nylon, the windsock has the smooth side on the outside. When it gos through the rollers, it has the appearance of woven material, but it is continuous two sheets of compressed nylon. There are absolutely no gaps in the surface of the material.

It is self washing, and so this does not aid the adhesion of logos and sign writing, but sign writer plastic signs can adhere, but for how long? There are no guarantees.

There are 2 grades: Grade 3 and Grade5. (3 ounce/square foot for the standard windsock, and 5 ounce/square foot for the heavy duty windsock.)

One of the manufacturers is Canvaco.

The material is ‘Hot Needle Stitched’ and is also triple stitched.

The hoop, which is sewn in, is like grey electrical conduit.

The material does not stretch eg. Shirt material has a stretch factor of 4% and this materials’s stretch factor is approx. 1% – 1.5%.
types of Windsock Lighting


By |2021-06-13T10:03:42+10:00November 28th, 2010|Windsocks|Comments Off on Windsock Material For 8 & 10 Foot

Windsock Specifications 8 & 12 Foot

These are available in white, or yellow, and are also available in a choice of standard weight or heavy duty versions. the heavy duty version being for places of extreme wind, cyclone prone, or tropical areas.

The 8 & 12 foot windsocks are calibrated for Aviation use, fitted with an internal hoop and four large attach eyelets, and is supplied with heavy duty cable ties to attach to a 2ft diameter frame for the 8ft windsock, or a 3ft frame for the 12ft version.

The heavy duty windsock will outlast the standard weight by an estimated 50% under the same give conditions.

The standard weight windsock is slightly more ‘active’ in very light wind conditon.

12ft windsocks are the ‘standard’ for use at licenced and council airstrips and airports.

It is quite possible that there are several ‘primary’ windsocks at an airport, (one for each runway, and often one near the end of each runway.

Colour choice of windsocks for non commercial use is simply a matter of what stands out the best against the background colour as seen from the air. Yellow is easier to see against a background of sky, or as seen from the ground. Both colours illuminate well with the 12 volt lighting option, as the materials used have good fibre optic qualities.

8 & 12 ft Windsock Support Frames

These are made of 304, 316, 320 and 4000 grade stainless steel.

The 8 ft windsock frame has a 24″ (600mm) diameter rim, and the frame for the 12′ windsock has a 36″ (900mm) diameter rim. These frames may be fitted with internal 12 volt lighting…. See the”Windsock Illumination” section below:


The sealed ball bearings, that are used top and bottom, should never require any lubrication or attention. The top bearing is also capped with a seal that is a tight press fit to the centre shaft, and offers further protection to the top bearing.

The base plate of the frame is a 10mm plate with studs at 50 & 80mm spacing, stainless washers and Nylock nuts are supplied for fitting either directly or via the “Welding Adapter”.

Welding AdapterAs the frame is stainless steel, (Which will not weld to ferrous metals.) thus the ‘Welding Adapter’ is recommended if the intention is to attach the frame to a metal pole end.

It is pre-drilled to match the frame stud pattern and base, made of malleable low carbon ferrous metal, that has been selected for ease of welding, using either gas, or electric arc methods.

The support frames are made for extra long life, and carry a 25 year replacement warranty. The same frames are also available (By special order) made from 316 grade stainless steel, and are ideal for offshore oil-rigs and other highly corrosive environments.

Windsock Illumination

Windsock illumination is available for the 8 and 12 foot windsocks. This operates from any 12 volt power supply, motorcycle or automotive battery, simply using battery clips or plug in using standard automotive cigarette lighter.

The lighting is 50 watt, halogen, and draws only 4 amps. (Less than a low beam headlight.) It is 100% reliable, and maintenance free. Solar charging, and remote switching are (add on) options. A spare 3000 hour life bulb/reflector is supplied.

Cable ties and spare bulb fuses

Cables and Ties as supplied in the lighting kit, including spare bulb.


Lighting On A Windsock Frame

Lighting on earlier frame.


By |2021-06-13T10:03:42+10:00November 28th, 2010|Windsocks|Comments Off on Windsock Specifications 8 & 12 Foot

Windsock Installation 4 & 6 foot

Windsock to Frame

Attach windsock to frame using the cable ties supplied, keeping the longitudinal seams of the windsock at the 3 & 9 o’clock positions. The cable ties should be tight enough so that the windsock is restricted form rubbing on the frame rim.

Windsock Frame to Vertical Support

Any suitable support pole or pipe may be used to gain the required windsock height.


If a pipe is being used, insert a bolt or a pin, through the upper hole in the support rod, then insert the rod into the pipe. A rubber cap, such as a chair leg end piece, may be used to cover the join.

4 and 6 windsock pole 1

Note that the 23cm space between the holes of the frame support rod, will match up with the hole spacing of most BHP metal star posts and may be directly attached using wire, bolts or cable ties.

This method is well suited to a 4 foot windsock; and using two star posts joined, will well suit a 6 foot windsock. (The extra height needed, due to extra length.)

Tape over any sharp parts that are within the sweep of the windsock, or cut a hole in a plastic spray can lid, a small tin can, or cut the base out of a plastic bottle, then sleeve onto the support rod in order to cover any rough projections that could snag the windsock at this joint.

For a more permanent windsock installation, the star post section may be covered with any suitable 50mm PVC vent pipe so that there are no external sharp parts that could cause windsock damage. This pipe is readily available at around $6/m

It is recommended to snip the cable ties and rotate the windsock, top to bottom (180°) on a yearly basis.

Standard cable ties may be used, the black ties tend to be more ultraviolet resistant than the clear ones, and as a result the black ones should last longer.

It is important that the windsock pole and frame is exactly vertical, or the windsock will constantly swing to one side.

The 4 & 6 foot windsocks are available in ripstop, they are chemical & UV resistant, and of a lightweight sailcloth material in white, yellow, pink or orange.

White has the least problem with fade, Yellow can normally be see the greatest distance, and tends to attract attention more than the white. Pink is used on grassland and forest areas, where white or yellow blossoms are possible, and orange is used in snow areas only.


By |2021-06-13T10:03:42+10:00November 28th, 2010|Installation, Windsocks|Comments Off on Windsock Installation 4 & 6 foot

The History Of The Australian Windmill

As Australian as lamingtons, dirt roads and kangaroos, this “Glenview Range” of Model Windmills are faithfully hand made replicas of the windmills that have graced the Australian skyline for nearly a century. Before electricity was available to drive pumps, or large machines to build dams, the windmill had become a vital component of rural life, pulling water from bores and wells.
They can be traced back to the year 644 in Persia. It was Persian millwrights taken prisoner by Genghis Khan who instructed the Chinese in their construction for irrigation, a use that lasts to this day. They became increasingly widespread in Europe from the 12th century to the 19th when steam power caused their slow demise, which was accelerated after World War One by the internal combustion engine.

Australia and it’s vast rural areas was still a stronghold of this inexpensive low maintenance method of watering stock and moving water for irrigation. In 1871 George Griffiths set up a mechanical workshop in Toowoomba thus starting, what is now the Southern Cross Group of Engineering Companies. His first wooden framed windmills were built in 1876 and supplied to Jimbour Station at Dalby on the Darling Downs. Between1876 and1884 these simple direct acting windmills were made in several sizes up to 16ft in diameter.

A patent had been applied for in 1875.The “Simplex Economy” and “Little Wonder” mills were produced in various sizes and often to customers’ specifications until 1893. Usually of timber, the wheel operated behind the tower while reefing (to control the speed) was done by means of a counterweighted vane on a lever at right angles to the vane pole.

1893 saw the first geared windmills and the advent of the wheel on the windward side of the tower. In sizes to 18ft in diameter and with progressive improvements, over 300 of these mills were built in a decade. In 1903 the brand name Southern Cross was given to windmills produced by the Toowoomba Foundry and a range of both geared and direct action self oiling mills is in production to this day. Over nearly a century, in excess of 200,000 have been produced, the majority for use in rural Australia where they have become an indelible feature of our landscape.

Several groups of Southern Cross Mills contributed to the unique visual flavour of Expo 88, while another stands outside the Stockman’s Hall of Fame at Longreach to symbolise the role played by these machines in the development of the outback. Others have been exported to Ireland to pump out peat bogs prior to extracting the fuel, and others to Kwinana where nearly 100 resembling a forest of steel wheels are recovering chemicals from an underground aquifer.
Birdsville’s water supply is driven by a huge, Southern Cross Windmill drawing water from the Diamentina River, while in Hawaii another is irrigating a tropical fruit farm. Architects and developers are increasingly using windmills to add visual excitement and a truly Australian flavour to their projects.But the nicest touch of all is the recent shipment of 100 windmills to their original birthplace – Iran – formerly Persia.

Now……… if you purchase your own personal windmill you will have enough information to generate conversation with just about anyone.

By |2021-06-13T10:03:42+10:00November 28th, 2010|Windmills|Comments Off on The History Of The Australian Windmill

Windsock Colours

Windsock Colours. Standard and Special Purpose.

Standard Colours for Aviation Purposes are White and Yellow. The Primary windsock at an airport is white. The secondary windsocks are yellow. They are by regulation 8 foot or 12 foot long.

Special Purpose Windsocks (more correctly called Wind indicators)  They are usually 4 foot or 6 foot long and fall into the following colour categories :

Yellow is the most visible and are useful when view the wind indicator from the ground on a cloudy day when it can be difficult to see a white Wind indicator against a sky full of white clouds.

Pink is an unnatural colour and is usefully used in forrest country.

Orange is used in snow country because of its high visibility. It is also used for road works and similar purposes.

Red is used on mining sites and Rifle ranges and indicates danger.

Dark green is used for crops and orchards to gauge the drift when spraying chemicals.

Warning It is very hard to stabilise the colours Red, Pink and Orange and so these products do suffer fade because of the suns ultraviolet rays.
Yellow Windsock

By |2021-06-13T10:03:43+10:00November 28th, 2010|Windsocks|Comments Off on Windsock Colours

Wyoming Windsock

Wyoming windsocks are made of different materials to the ones used in Australia. I guess the picture tells the story.
Wyoming Windsock

By |2021-06-13T10:03:43+10:00November 28th, 2010|Windsocks|Comments Off on Wyoming Windsock
Go to Top